Landscape Maintenance: Learn how to control Mealybugs on your plant.

Have your plants ever attacked by Mealybugs? Or you do not know what a mealybug is? How it is look like? And what is so interesting about it? Well for those who like landscaping and gardening maybe they already synonym with this insect but for those who are still new most probably the do not know.

Mealybug is an insect and it is belong to the Pseudococcidae family, this insect can live in moist area and also can be found in warm climates. They live by get feed from plant juice that can be found on a greenhouse plants, flower and ornamental plants.

They are easily to spread out especially if the area meets all their requirements. As such to remove it or to control it could not be an easy task. It is important to get rid out of this insect as it can put harm and jeopardize our plants, trees and flowers. As a result our landscape view will spoil and we need to put extra cost for the maintenance.

How to control Mealybugs? Well I am giving out free tips on how we can control this insect. First of all do investigation. Check all of your plant for any sign of this insect existence. It is easy to identify you just check your plant’s leaf, if you find any white spot of insect like small cotton ball that could be a Mealybug.

Avoid apply extra fertilizer on your plants. You just put the fertilizer as and when necessary only. You can get information from the nursery. This to prevent Mealybug breeding as it grows well in a nitrogen-rich soil.

If had you noticed your plants already were attacked by this insect you can do some maintenance. Just get rid of mealybugs with a cloth, tissue or paper towel, you can you anything but make sure that you squish them before you throw into the garbage bag. You need to carefully check all potential area please look for the eggs sacks and remove those as well. The egg sacks will look like small cotton balls attached to the plant.

You can use a spray that mealybug-specific pesticide onto the plant to get immediate results on mealybug control. Pesticide sprays, however, are only a short-term solution for mealybug control and should not be used as the only method of controlling the infestation.

There are few good tips to follow. Before you purchased any plants do checking for mealybugyou’re your plant already places in the ground you need always checking around and removes them at the early stage. If you are applying pesticide spray do not aim directly to the soil.


Backyard Landscape Design: Learn 5 FREE TIPS on How You Can Build Your Small Pond.

1. Measure Your Area.
First of all you need to measure how large are you area. Then you need to identify which area your pond to be put in place. Make sure the area selected has an access, easy for maintenance and of course it is good in location (nice view).  If you're going to use a filter or pump, make sure there is an electric power supply available.  A good tips for you to follow, please do not build your pond under a tree or a place that is difficult to access because this require a complex design, it will involve an additional maintenance and extra cost.

 2. Do Marking For Area Selected.
You can do some marking and sketch out the area of your pond. You can draw on a piece of paper first, make you study and finalize your design. Once you have confirmed, you can transfer it on the location you have decided. You can use any existing material to do marking such as a rope, extension cords or garden hoses to lay out the outline of your pond and streams. Ask help from your family members, you need to adjust the size and shape until you are happy with the look. Also make sure you leave enough surrounding area around you pond for adequate landscaping. If everything is satisfactory, take the spray paint and use it to paint the outline of your pond. Make sure the paint color is correct so that you can have a good marking.

3. Pond Excavation.
Basically to excavate the pond is not so difficult. Everything is depends on your landscape pond design. If your pond design is small and simple you just can dig your pond with ordinary shovel only. Otherwise if your ponds design involving a big area and a bit complex you can rent a back hoe for the job. If you plan to have a plant shelves in your pond than your pond should be dug with a variety of depth. In order for you to build these shelves, you need to hand dig the edges of the pond with a shovel to get the chiseled edges you desire. It is advisable on having your perimeter edge 3" to 5" (7-12cm) over the desired water level of the pond. Your pond depth is recommended to have at least 2 feet deep. A good tips for you to follow, please verify that there are not any buried utilities such as water pipe line, gas line or etc near the area you plan to dig.

4. Make a Pond Slither (Skimmer).
The function of skimmer is to ensure your pond water level is always at the correct level when it is full. While you are digging your pond you can at the same time dig a place for skimmer. The perfect set up is having the water level 1" (2.5cm) below the top of the throat in the skimmer. Once your water level has been determined, you should set the height for the skimmer. You should have your skimmer nearly directly across from your filter or the discharge of your stream in order to provide good flow and allow the skimmer to work its best.

5. Pond Underlayment Installation
 Before installing you just check your newly excavated area to make sure it is free of any sharp objects that could puncture the liner. Once you satisfactory you can start with the installing project. For you to install the underlayment is very easy. You just unfold and place the underlayment into the pond. If there is more than one section, be sure to overlap them a few inches. Do your best to make the underlayment conform to the shape of your pond and plant shelves. Do not trim the extra underlayment until you have filled the pond.

Now your pond is ready to be full with water. You just need to add your accessories to the pond and start to do landscaping around your pond. You can start to add suitable plants, flowers or maybe a fish. You can do your own research and find more tips on how to decorate your ponds.


Botanical Garden: What is Aquaponic?

Aquaponic definition can be described as an alternative way to grow crops and at the same time we can keep the fish in the same container. It sounds weird right? But this is a very good idea to create new environment and something look different.  

For those who hunger for landscaping ideas you can try this out. The Plants will utilize nutrient derived from fish feces by circulation. The feces produced from the fish can be toxic to the fish itself thus plants is serve as a filter that would decompose toxic substances from fish feces into substances that are not harmful to fish , and oxygen in the water supply is being used to preserve fish.

The reasons why Aquaponics is chosen because we can cultivate crops and fish together , and we can also reduce the excretion of waste product that normally contaminate the fish. As a result an healthy organic crops also can be produced because they do not use pesticides or an- organic fertilizer .

There are many ways that we can do to make our Aquaponic . Here I will share with you a free tips on how you can make your own Aquaponic with an easy and inexpensive. The design is depends on you but the main point is the water circulation of water.

Therefore I will elaborate more on how the system works. Good system will maintain and less maintenance. So this will benefit you a lot right? Your landscape design will last long and you will have more time to spend time on you other activity such as do gardening and so on.

In order to have an efficient Aquaponic system we need to design first. It can be anything but here let me share the very basic one. The items you need to prepare are:
  • ·         Fish Aquarium (Any suitable fish container also can be used)
  • ·         Plant Container (This also can be anything)
  • ·         Recirculation Hose (Long enough to recirculation the water)
  • ·         Recirculation Water Pump

So the principle is so easy, the Recirculating Water Pump will take suction from the Fish Aquarium and then it will deliver the water via the Recirculation Hose. This water will be supplying into the Plant Container. The Plant Container will be having a return line allowing only water passing directly into the Fish Aquarium.  

The theory is so easy to understand. As for now I think maybe you can start thinking your own Aquaponic right. I think this idea will be great and can be combined with your landscape ideas.

Thank you..........


Garden FREE Tips: How To Remove Weeds !!!

Weeds are the plant of the grass family that grows wild in almost all areas, especially in open areas. It also can thrive in less fertile areas. It is known as the most stubborn kind of grass and it is not easy to destroy this tree, as a result it can create unattractive scenery to our landscape view. Only some types of pesticides that can be used to kill weeds trees.

If weeds grow on the farm or garden, it will interfere with other crops. This plant has a very fast growth rate compared with grass or other plants. They reproduce quickly and unnoticed because propagation through its roots is in the ground. It also reproduces by seeds blown by the wind at a considerable distance.

I would like to share with you free tips on how you can remove the unwanted weeds easily. I hope this tips can help you to take good care of your garden and protect your landscape so that you will never lose the beauty of your dream landscape.

You can start with identifying the weeds you want to remove, so you do not accidentally pull beneficial or desirable plants while you work. This step is so easy you just take a look at your plants the damage one or any wild grass or indefinable growth can be considered as a weed. The simple one if you see your landscape and you noticed something weird plant is growing then it is also can be a wild weed.

Before you carry this job you also need to consider the hazards when pulling the weed .Here are some dangers involved in this apparently safe activity. You need to beware of toxic plants, including stinging nettles, poison ivy, oak, and sumac, and plants you may be allergic to. Be aware of insects that may inhabit your garden or lawn. Spiders, bees, wasps, ants, and other potentially dangerous insects may be encountered while enjoying this activity. Watch for snakes if you live in an area they frequent. Understand your own limitations. Weed-pulling can be back-breaking work, so be careful not to overdo it. Wear sunscreen and keep hydrated while you work if you are working in hot weather and/or bright sunshine.

Get your safety protective equipment first such as a pair of gardening gloves, face mask or face cover if you like. You may also want to get a sharp pointed gardening spade and a cushion to protect your knees while you work. The time also is important, you are advisable to choose the right time for the task. Pulling weeds is much easier when the ground is wet, so working soon after a rain will make the job easier. The soil strength was weakening by water so it is easy for you to pull out the weed together with the root.

Here are the techniques you can grab the weed at the base of the main stem as far down as possible. Then grip the bottom of the weed tightly and pull it sharply out of the ground. Continue until you have done this with all the weeds leaving you with a weed-free garden. Use a pointed tool to loosen the soil around the weed's roots if necessary, to make removing it easier. Collect the weeds and dispose of them so their seeds are not reintroduced into your lawn or garden.

That is all you need to do. If you are unable to carry out this task alone you always can ask help from your family members. This could be a fun and healthy activity, but please put safety first in mind before do the task.

If You Like To Find More FREE TIPS In Gardening or Landscaping, Please Click HERE!!!


How to Build A Simple Garden FREE TIPS!!!!

Nowadays a garden was made ​​to adorn the home landscape design. Actually simple garden plays an important role and have its own function as a setting for the house landscape. In order to build a small garden is not difficult. It is also not costly due to the area affected is not so wide.

The location is depend on you, basically you can design it anywhere you like as it would be identical in anywhere due to it small sizes. Keep in mind that small garden is not only used to beautify the front yard, but the garden itself also has very diverse functions.

For example as water catchment areas, the park will give the impression of shade for your home. If the house does not have a garden then the house will give the impression of a hot and arid. Therefore, no matter how small parcels of land in front of your house, you should be able to make the creation of a small garden in front of your house.

There are few things you need to aware while setting up your garden and you need to pay attention to some things that support the beauty of the park that you have created. Kindly find follows some tips to enhance the beauty of your garden.

Plant small trees that having a shady design. If you like to build a garden, a tree is the main thing, because it can gives the impression of a shady garden in your home. You also can plant grasses and flowers this can give more value into your landscape design.

You also can use of natural stone, use of natural stone for the creation of a small park in front of the house. Natural stone can help the small park in front of your house becomes more natural. Arrange these natural stones around the edge of your small garden.

As for now I hope those tips above can help you and give you some ideas on how you can improve your house landscape. What is you need now is only action. Just start from the basic first take an empty paper and start list out your action plan.

You can start with your landscape theme first, then you can find where is the best location to start over. Please list down one by one and take your time. You can start from the easy step first. My advice is asking an opinion from your family members. Good luck and all the best.


Landscape design: What criterion should be maintained?

Criterion or principle is a guide for you in designing your dream landscape. Below are some tips and guidance that you may follow while setting up your landscape design. Actually there are still many more and you can make your own research. However you can read point below for the basic starter.
 
1. Consistency
We can translate this as having a specific theme ( Bali , Zen , modernistic , simple , etc.) or simply be consistent in choosing the plant in terms of color ( green , bright colors , etc. ) , height ( 5 feet higher , more lower than the knee , etc. ) , nature ( vines, tropical etc) and so on . It is about giving the main expression of our landscape.

2. Equilibrium
 It's about symmetry in the landscape; example palm trees on both sides of the entrance have the same number of trees on both sides of the garden and so on. Actually “imbalance” is also a concept or principle in the design of the landscape; the abstract form or "free - form" (free -form) but still consistent. For example, the form of the flower - bed free-form but have the same flower color in it. Or if we have a row of palm trees green and we interval with red palm at random intervals so that the color is more vibrant without monotony.

3. Colors
Color is the main reason why we choose certain flowers or plants. Bright colors like red, yellow and orange will look closer and cool colors such as green, blue and pastel will look far. So if planting brightly colored plants in front and behind the soft color, the page may appear larger.

4. Line.
This is on the fence, road, bridge, stone arrangements or flower bed design. We want straight or wavy? What is the theme of our landscape?

5. Rate or proportion
This is the principle on the size of the materials in the landscape design. If a small area of ​​your landscape and you will use a small tree why suddenly there is a huge sculpture in the middle? Leave all plants, and landscape so you have size at the same rate.

6. Deuteronomy
This concept with the principle of ' consistency ' last. Just remember one thing; too much of one color or a plant to be boring. But too many types or variety will cause the landscape looks like a check and do not have a plan.

All in all this does not mean that this is final. There are many other intellectuals in there that will have an idea or principle design their own landscape. Hope these landscape ideas could give you something to start with. Have fun.


How To Plant A Lily Flower FREE TIPS....

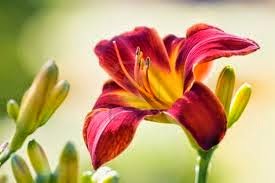
Lily flower or Lilium can be classes as a summer flowers. These beautiful flowers used to embellish your landscape design with bright color and smell of fragrance. This beautiful flower was known since the ancient of Greek . The name of Lily or Lilium is the Latin form and was derived from the Greek word, Leirion .

At first Lily grows in the plains of the Mediterranean and the Middle East and almost every house was adorned with the beauty of this flower. Even then the flowers were developed in the agricultural area. The distribution of lily covers regions of Europe and the Mediterranean region including North , crossing of Asia toward Japan , India , and the southern Philippines . And now it has spread to southern Canada through the United States.

Lily is a flowering plant that grows from the ground. There are around 100 species of lily flowers. Soft colors and a special fragrance make this flower is often grown as ornamental plants. Lily is very easy to grow and some varieties can be found growing wild in large numbers. Lily takes time to grow in cold climate. This means that they grow best in areas of summer.

This ornamental flower is not so difficult to plant. I will share with you how to plant this flower. I hope the following tips and info can guide you and benefit you something. Well guys lets continue reading and have fun.


  • First, Lily flower love a lot to sun exposure, however it is not scorching hot. So, make sure that it is grown in an area like that. If the heat is to dense, use a plastic or netting to reduce the radiant.
  • Second, make sure the soil does not hold water. During raining season there will be a stagnant in some area means that it is not suitable to plant this flower. Thus please find some other place that you think suitable.
  • Third, if the tree is less fertile you can put the fertilizer. Please don’t apply too much just enough about once a month.
  • Fourth, you need to regularly remove the flowers and the leaves that are withered to encourage the growth of flowers and new leaves.
  • Finally, always make around and take care of your flower, ensure there is no insect or and pest living together in your flower.
Now you already have some knowledge on how to start planting Lily flower, I hope those information can give you something to start working on. I wish you all the best and thank you for your reading.

Free Video on How To Plant A Flower FREE TIPS REVEALED, Click Here Now!!!